basic-snmp-configuration-on-network-devices
In this section, we configure SNMP on network devices to allow external monitoring of system parameters. The focus is on SNMPv2c, which uses community strings as a form of access control. While this version lacks encryption and strong authentication, it remains widely used in legacy and controlled environments due to its simplicity.
1 Introduction to SNMP Community Strings
SNMPv2c relies on community strings to regulate access to device information. These strings act like passwords and are used to determine whether an SNMP manager can read or modify a device’s MIB (Management Information Base) data.
There are typically two types of community strings:
- Read-Only (RO): Grants permission to retrieve data without the ability to make changes.
- Read-Write (RW): Grants permission to both retrieve and modify data on the device.
By default, some devices may use weak or well-known community strings (e.g., public or private), making them vulnerable to unauthorized access if not changed.
2 Example Configuration on Cisco Router
The following example demonstrates how to configure SNMPv2c on a Cisco IOS device with a read-only community string:
R1(config)# snmp-server community public RO
R1(config)# snmp-server location Lab-Network
R1(config)# snmp-server contact admin@example.com
Explanation:
- public: The community string used by the SNMP manager.
- RO: Specifies read-only access.
- location: Identifies the physical or logical location of the device.
- contact: Provides administrative contact information.
To verify SNMP is correctly configured and reachable, you can use tools such as snmpwalk from a Linux host:
snmpwalk -v2c -c public <router_ip> 1.3.6.1.2.1.1.1.0This command queries the system description OID to retrieve basic information about the device.

You can also confirm SNMP activity on the router using:
R1# show snmp
R1# show snmp community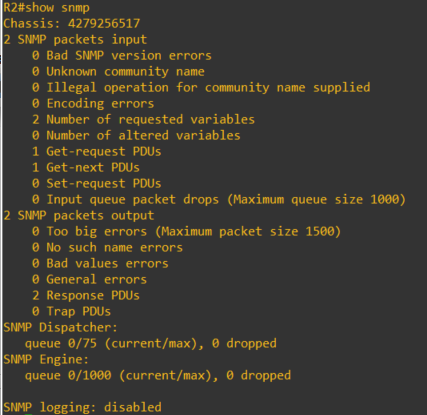
These commands display SNMP statistics and configured community strings, confirming that the service is active and properly set up.
3 SNMP Setup on Ubuntu
To monitor an Ubuntu server or workstation using SNMPv2c, you need to install and configure the SNMP daemon (snmpd). This section covers installation, basic configuration, and verification.
Step 1: Install SNMP Packages
Use apt to install the necessary packages:
sudo apt update
sudo apt install snmp snmpd -y
Step 2: Configure SNMP Daemon
The main configuration file is located at /etc/snmp/snmpd.conf. Begin by backing up the original and editing the file:
sudo cp /etc/snmp/snmpd.conf /etc/snmp/snmpd.conf.bak
sudo nano /etc/snmp/snmpd.conf
Replace the default content with the following minimal SNMPv2c setup:
agentAddress  udp:161
rocommunity public
sysLocation    Ubuntu-Server
sysContact     admin@example.com
Explanation:
- agentAddress: Tells SNMP to listen on UDP port 161 for all interfaces.
- rocommunity public: Allows SNMP managers with the community string public to perform read-only queries.
- sysLocation: Describes where the host is located.
- sysContact: Provides a point of contact for system administrators.
Optional: To allow remote queries (not just from localhost), edit the agent address line:
agentAddress udp:161,udp6:[::1]:161Or, for all IPv4 interfaces:
agentAddress udp:0.0.0.0:161Step 3: Restart and Enable SNMP Service
After saving changes:
sudo systemctl restart snmpd
sudo systemctl enable snmpd