implementing-brute-force-mitigation-with-fail2ban
1 Introduction to Fail2Ban and Its Role in Security
Fail2Ban is an intrusion prevention software that monitors log files and bans IP addresses after repeated failed authentication attempts. It helps protect against brute force attacks by blocking malicious IPs for a specified duration, reducing the risk of unauthorized access.
2 Installing and Configuring Fail2Ban
- Install Fail2Ban:
sudo apt install fail2ban -y - Enable and start the Fail2Ban service:
sudo systemctl enable --now fail2ban - Create a local configuration file:
sudo cp /etc/fail2ban/jail.conf /etc/fail2ban/jail.local
Copies the default configuration to a local file for customization.
- Edit the jail configuration:
sudo nano /etc/fail2ban/jail.local
Modify settings such as:
	[sshd]
	enabled = true
	maxretry = 3
	bantime = 60
	findtime = 60
maxretry: Number of failed attempts before banning.
bantime: Duration (in seconds) an IP remains banned.
findtime: Time window for counting failed attempts.
- Restart Fail2Ban to apply changes:
sudo systemctl restart fail2ban
3 Testing and Verifying Fail2Ban Effectiveness
- Attempt multiple failed SSH logins to trigger a ban (We’ll try the brute force attack again).
- Check banned IPs:
sudo fail2ban-client status sshd
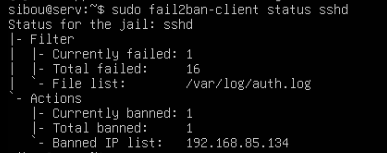 And obviously, our ip got banned.

- To unban our IP, we simply type this command:
sudo fail2ban-client set sshd unbanip <IP-ADDRESS>